
Slippage tolerance is the maximum percent gap you'll accept between the price you expected and the price you actually get. Set it, and the trade either fills within that window or reverts. As a starting point:
- Stablecoin pairs: 0.1%–0.3%
- Major, liquid tokens: 0.5%–1%
- Low-liquidity or volatile tokens: 2%–5%
Quick stat: most decentralized exchange interfaces default to somewhere in the 0.5%–1% band, then let you adjust manually in the swap settings, usually behind a gear icon near the price quote.
First move: open your wallet or DEX interface, find that settings icon, and check what percentage is already selected before you swap anything. If it's set to something you didn't choose, that default was picked for average conditions, not your specific trade.
Key Takeaways
Slippage tolerance works when it's matched to pool liquidity trade by trade, not left on a fixed default across every swap.
| Point | Details |
|---|---|
| Match tolerance to liquidity | Use 0.1%–0.3% for stablecoins, 0.5%–1% for major tokens, and 2%–5% for thin or volatile pairs. |
| Too tight fails, too loose exposes | Low tolerance risks reverted transactions and wasted gas; high tolerance invites sandwich attacks. |
| Check price impact before confirming | A swap needing wide tolerance to succeed usually signals shallow liquidity in that specific pool. |
| Compare routes on larger trades | Aggregators like OmniRout show fees, gas, and slippage side by side before you sign anything. |
| Weigh total cost, not just slippage | Splitting orders or raising gas price to cut slippage still adds its own cost, so compare the full picture. |
Table of Contents
- What Causes Slippage in Crypto Trading?
- How Does Slippage Tolerance Actually Work?
- What Slippage Percentage Should You Actually Use?
- Why Do Failed Transactions and Sandwich Attacks Happen?
- How Do You Minimize Slippage on Every Trade?
- How Does OmniRout Help You Manage Slippage?
- Does Slippage Tolerance Affect Gas Fees and Transaction Costs?
- How Does Slippage Tolerance Work Outside of AMM Swaps?
- What's the One Setting Most Traders Get Wrong?
- Frequently Asked Questions
- Sources
What Causes Slippage in Crypto Trading?
Slippage is the gap between the price you expected when you clicked "swap" and the price you actually got once the transaction confirmed, and it can run in your favor (positive) or against you (negative), according to Uniswap's explainer on slippage. It shows up most in volatile or thin markets, where the order book or liquidity pool can't absorb your trade size without moving the price.
A few forces drive it:
- Liquidity depth — a pool with less capital moves more per dollar traded.
- Order size relative to the pool, known as price impact, where a $50,000 swap against a $200,000 pool moves the price far more than the same trade against a $20 million pool.
- Volatility, where the price simply moves between the moment you submit and the moment it confirms.
- Network delays, where your transaction sits in the mempool waiting for a block.
Automated market makers (AMMs) price trades algorithmically, using a formula that shifts price as your trade size grows against the pool's reserves. Order-book exchanges instead match you against existing buy and sell orders, so your price impact depends on how deep the book is at each price level, not on a formula.
How Does Slippage Tolerance Actually Work?
Slippage tolerance is the percentage buffer you set around the quoted price, and it's the single lever standing between a smooth trade and a stuck one. Here's how platforms turn that percentage into a real transaction rule:
- You pick a percent (say, 0.5%) in the swap interface.
- The platform calculates a floor or ceiling. For a sell, it sets a "minimum received" amount; for a buy, a "maximum paid" amount, both derived directly from your percentage, as 1inch's help center describes.
- The trade executes on-chain. If the final price lands within your buffer, it goes through.
- If price moves beyond your tolerance before confirmation, the smart contract reverts the transaction rather than filling it at a worse price.
Some platforms let you set tolerance as a flat percentage; others, including certain order types on Bybit, let you specify an absolute price band instead, which effectively turns a market order into something that behaves like a limit order. Either way, the mechanism exists to protect you from a price that moves too far while your transaction is in flight.
What Slippage Percentage Should You Actually Use?
The right number depends entirely on what you're trading and how busy the network is. Platform documentation converges on a few common bands, according to Gate's glossary on slippage tolerance:
- Stablecoin-to-stablecoin swaps: 0.1%–0.3%, since these pools are typically deep and prices barely move.
- Popular token pairs (ETH, major L1 tokens, blue-chip DeFi assets): 0.5%–1%.
- Low-liquidity or highly volatile pairs, or trading during network congestion: 2%–5%.
Stat worth remembering: MetaMask's swap documentation notes that 0.5%–1% tolerance is often a reasonable balance for many swaps, adjusted up or down based on the specific token's liquidity.
Tighten your tolerance when you're trading deep, stable pools with low volatility. There's no upside to leaving room for a 3% price move that won't happen. Widen it when liquidity is thin, when you need the trade to go through immediately, or when the network itself is congested and confirmations are slow. The trade-off is blunt: too tight and your transaction fails, wasting gas without executing; too loose and you're exposed to price manipulation between submission and confirmation.

Why Do Failed Transactions and Sandwich Attacks Happen?
Get the setting wrong in either direction and you pay for it, just in different currencies. Too-low tolerance means your transaction reverts the moment price moves past your narrow band, and you still pay the gas fee for a trade that never happened. On a congested network, that can mean paying twice, once for the failed attempt and again for the retry.
Too-high tolerance opens a different door: front-running and sandwich attacks, as 1inch's documentation on slippage settings points out. Here's the mechanic. A bot watches the mempool for pending swaps with generous slippage tolerance, then:
- Buys the same asset right before your trade, pushing the price up.
- Lets your trade execute at that inflated price, within your wide tolerance band.
- Sells immediately after, pocketing the difference your tolerance allowed.
Your trade still "succeeds," technically. You just paid more than you should have, and the bot walked away with the spread.
Pro Tip: If a swap keeps failing at low tolerance, don't just crank the percentage up to whatever makes it work. Check the pool's liquidity first. A trade that needs 4% tolerance to succeed on a token with $30,000 in liquidity is telling you something about the trade itself, not just the setting.
How Do You Minimize Slippage on Every Trade?
Reducing slippage is mostly about discipline, not finding a secret setting. Coinbase's guide on minimizing slippage impact lays out the core tactics, and they hold up across most trading situations:
- Use limit orders wherever they're available. On centralized exchanges, a limit order guarantees your price or better, full stop. No slippage tolerance needed because there's no execution outside your set price.
- On DEXs without limit-order functionality, set conservative tolerance and split large orders. Breaking a $100,000 swap into five $20,000 chunks reduces price impact on each individual trade, even though you'll pay gas multiple times.
- Run your trade through a route-comparison aggregator before committing. These tools estimate fees, gas, and slippage across multiple liquidity sources, so you can pick the path with the lowest expected impact instead of guessing.
- Check liquidity depth and the price impact estimate the interface shows before confirming. Most decent swap interfaces display this number; if it's above 2% on a token you consider liquid, something is off with that pool.
- Watch gas prices and mempool congestion. Confirmations take longer when the network is busy, according to Gate's glossary, and every extra second in the mempool is another chance for price to move against you.
- Trade during higher-liquidity windows when possible, since thinner overnight or weekend liquidity on some pairs widens the effective spread.
Pro Tip: Set a personal rule: if the estimated price impact on a swap exceeds your planned slippage tolerance before you even submit, don't raise the tolerance to force it through. Wait for better liquidity or split the order instead.
How Does OmniRout Help You Manage Slippage?
Route comparison turns slippage management from guesswork into a side-by-side decision. OmniRout scans swap paths across more than 30 blockchains and shows the estimated fees, gas cost, and slippage for each route before you commit to anything.
That preview matters because the "minimum received" figure on a swap interface is only as good as the route feeding it. A route through a shallow pool might quote a competitive headline price but demand higher slippage tolerance to actually execute, while a deeper route on a different chain fills tighter with less room needed.
Seeing gas, fees, and slippage lined up side by side before you sign anything is what separates an informed swap from a hopeful one.
Practical guidance on when to reach for an aggregator versus swapping directly in a single pool:
- Use an aggregator when trading larger amounts, where price impact across a single pool would be steep.
- Use an aggregator when a token trades across multiple chains or pools, since the best price rarely sits in the first pool you check.
- Swap directly in a pool when the amount is small and the pair is deep and stable, where route comparison adds little.
Because OmniRout is non-custodial, you keep control of your keys through the entire process. You compare routes, pick one, and sign the transaction from your own wallet, without ever handing custody of your assets to a third party.
Does Slippage Tolerance Affect Gas Fees and Transaction Costs?
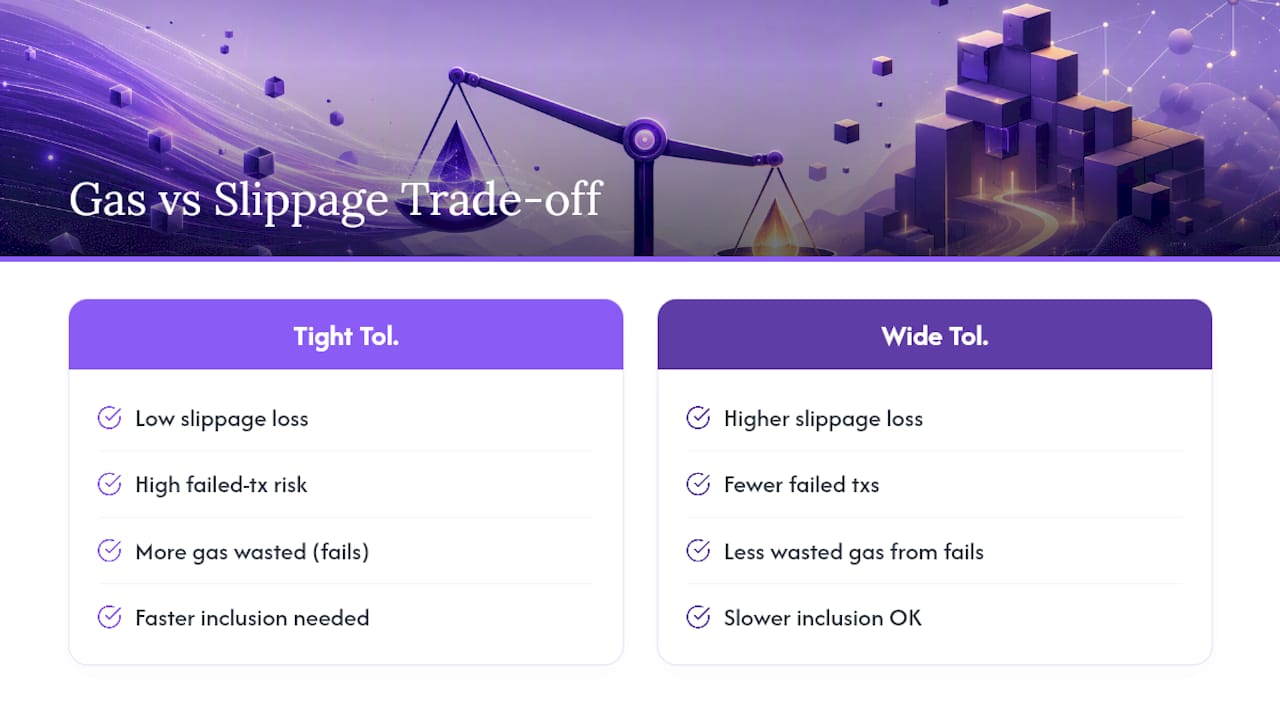
Slippage tolerance itself doesn't set your gas price, but it directly affects how much gas you end up wasting. Every failed transaction still burns gas, because the network has to process and reject it before the revert. Set your tolerance too tight on a volatile pair during a busy network period, and you can watch several attempts fail in a row, each one costing real gas with zero execution to show for it.
Tolerance also interacts with gas indirectly through timing. A transaction sitting in the mempool because you set a low gas price will wait longer for a miner or validator to pick it up, and that extra wait time gives the market more room to move beyond your slippage band. Raise your gas price to get faster inclusion, and you shrink the window where price can drift, which lets you keep a tighter slippage tolerance without triggering reverts as often.
There's also a compounding cost angle. If you split a large order into multiple smaller trades to reduce price impact, as covered earlier, you multiply the number of transactions and therefore the total gas spent. That's often still cheaper than the slippage you'd eat on one giant trade against a shallow pool, but it's a real cost to weigh, not a free lunch.
Some aggregators factor estimated gas cost directly into their route comparison, weighing it against the price improvement a given route offers. A route that saves you 0.3% on slippage but costs three times the gas of a simpler path might not actually be the better trade once you add both numbers together. Looking at total cost, gas plus slippage plus fees, gives a more honest picture than optimizing for slippage tolerance alone.
How Does Slippage Tolerance Work Outside of AMM Swaps?
Slippage tolerance isn't unique to token swaps. It shows up anywhere a DeFi protocol has to execute at a price that might move between your request and the on-chain confirmation.
Lending and borrowing protocols use a related concept when you're supplying or withdrawing collateral tied to a volatile asset's current price. If you're taking out a loan against ETH collateral, the protocol needs a live price feed to calculate your loan-to-value ratio at the moment of execution, and a sudden price move between your submission and confirmation can shift how much you're actually allowed to borrow. Some lending platforms build in a buffer similar to slippage tolerance to prevent your transaction from executing at a wildly different collateral value than you expected.
Liquidations carry a version of this risk too. When a position gets liquidated, the liquidator is essentially executing a forced swap of collateral for debt repayment, and that swap runs through the same price impact mechanics as any other AMM trade. A liquidation on a thin market can execute at a worse price than the position's actual value, which is one reason protocols with deeper liquidity integrations tend to produce fairer liquidation outcomes.
Yield aggregators and vault strategies that automatically rebalance between assets also rely on internal slippage settings, since a rebalance is just a series of swaps happening on your behalf. If a vault's rebalancing logic uses too wide a tolerance, users can lose value to price impact without ever manually approving an individual trade. The core principle carries over everywhere: any on-chain action priced off a live market needs some tolerance for that price to move before the transaction lands.
What's the One Setting Most Traders Get Wrong?
Most guides treat slippage tolerance like a fixed number you set once and forget. That's the part of the conventional advice that falls apart in practice. The right tolerance changes trade by trade, based on the specific pool you're hitting, not some universal default that works for every swap you'll ever make.
The bigger blind spot is treating a failed transaction as the worst outcome. It isn't. A failed swap costs you gas and a few minutes of annoyance. A sandwich attack costs you real money on a trade that technically "succeeded," and most traders never even notice it happened because the transaction shows as confirmed. If you're only ever adjusting tolerance to stop failures, you're optimizing for the visible problem while ignoring the expensive invisible one.
What actually helps: check the price impact estimate before every meaningful trade, not just when something fails. Compare routes when the size justifies it. Treat a swap that needs unusually wide tolerance to succeed as a signal about the pool's liquidity, not just a setting to crank up. The traders who lose the least to slippage aren't the ones with the perfect default. They're the ones checking the number every time.
Frequently Asked Questions
What is slippage tolerance in simple terms? Slippage tolerance is the maximum percent difference between your expected trade price and the actual execution price that you're willing to accept before the transaction cancels.
What is a good slippage tolerance for crypto trades? For stablecoin pairs, 0.1%–0.3% usually works.
What's the difference between slippage and price impact? Slippage is the overall gap between expected and executed price, including market movement during confirmation. Price impact is specifically how your own order size moves the price within a pool or order book.
Why did my DEX transaction fail even though I had enough gas? Your slippage tolerance was likely set too low for the price movement that happened between submission and confirmation, so the smart contract reverted the trade to protect you from a worse fill.
Can slippage tolerance protect me from sandwich attacks? Setting tolerance too high increases your exposure to sandwich attacks rather than protecting against them; keeping tolerance as tight as the pool's liquidity allows reduces that risk.
Should I use different slippage settings on a DEX versus a centralized exchange? Yes. DEX trades often need wider tolerance than centralized exchange orders because on-chain confirmations take longer and prices can move more during that wait, while limit orders on centralized exchanges avoid the issue entirely.
Sources
- What is Slippage? — Uniswap
- What Is Slippage Tolerance? | Gate Glossary
- What is slippage? — MetaMask
- What is slippage in crypto and how to minimize its impact? | Coinbase