
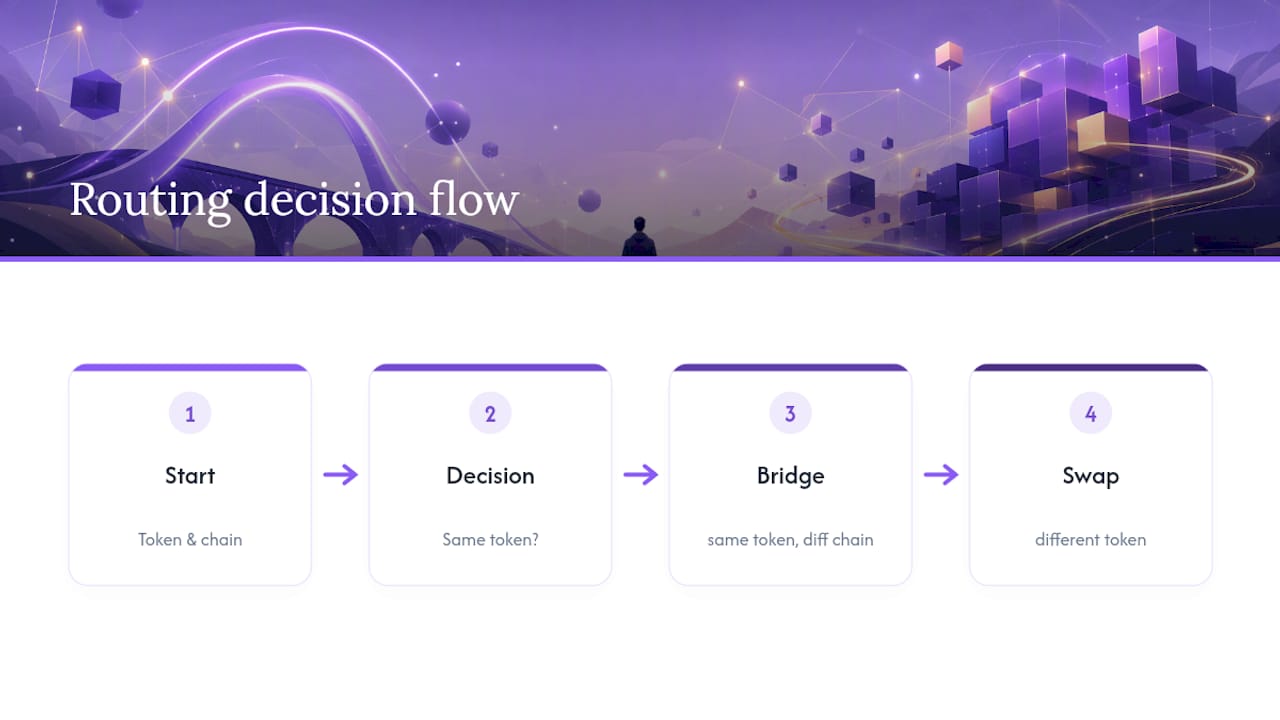
Bridge move a token to another chain; swap changes the token you hold. Need the same asset on a different network? Bridge it. Need a different asset, regardless of chain? Swap it. Need both at once? Use a cross-chain swap, which performs the move and the conversion in one transaction. Aggregators exist specifically to compare those routes so you don't overpay for either.
TL;DR:
- Bridges typically involve multiple steps with separate gas fees and can take minutes to hours, depending on confirmation requirements and network conditions.
- Cross-chain swaps performed via aggregators consolidate fees and execute in one transaction, often saving money compared to multi-step bridging and swapping.
- Trust risk on bridges increases with added validators and wrapped assets, while swaps mainly face liquidity and slippage risks within a single chain.
- Always verify contract addresses, run small test transactions, and set appropriate slippage to minimize exposure to exploits and losses.
- Comparing route options before moving funds can significantly reduce total costs and ensure you choose the fastest and safest method.
Table of Contents
- Bridge vs Swap: What a Crypto Bridge Actually Does
- What a Swap Does (Same-Chain and Cross-Chain)
- Bridge vs Swap: Comparing Fees, Speed, and Trust
- Bridge and Swap Risks You Should Actually Worry About
- How to Estimate Total Cost and Time Before You Move Funds
- When to Bridge, When to Swap, When to Do Both
- A Pre-Transaction Checklist for Choosing Safely
- How Omnirout Helps You Compare Bridge and Swap Routes
- What Actually Matters Once You Understand the Mechanics
- Compare Your Route Before You Move Anything
- Sources
Bridge vs Swap: What a Crypto Bridge Actually Does
A bridge moves value between two separate blockchains that otherwise can't talk to each other natively. Ethereum as connective infrastructure for transferring tokens and information between chains, and there isn't one universal design. Most fall into a few buckets:
- Lock-and-mint: your original token gets locked in a contract on the source chain, and a wrapped version gets minted on the destination chain.
- Burn-and-release: the wrapped token is destroyed on the destination side, releasing the original asset back on the source chain.
- Liquidity-based: a pool on each chain holds reserves, and the bridge just swaps your deposit for an equivalent balance from the destination pool, no minting involved.
- Message-based: validators or relayers pass proof of the transaction across chains, triggering the release or mint.
Here's what that looks like in practice. Send USDC from Ethereum to Arbitrum through a lock-and-mint bridge, and your USDC gets locked on Ethereum while an Arbitrum-native representation appears in your wallet, usually within a few minutes once confirmations clear. That representation isn't always the exact same token you started with. It's often a wrapped version backed by locked collateral, which means you're now trusting whatever validators, relayers, or smart contracts secure that lock. If you want to understand how native issuance compares to wrapped assets before you commit funds, that distinction matters more than most people realize until something goes wrong.
What a Swap Does (Same-Chain and Cross-Chain)
A swap changes one token into another. On a single chain, that happens through an automated market maker (AMM): you deposit token A into a liquidity pool and pull out token B, with the exchange rate set by pool ratios rather than an order book. The mechanics that matter here:
- Slippage: the difference between the quoted price and the executed price, worse in thin pools or large orders.
- Pool depth: deeper liquidity means tighter spreads and less price impact.
- Fees: a small percentage taken by the pool, plus network gas.
Cross-chain swaps add a routing layer on top. An aggregator finds a path that might involve multiple pools or a bridge step behind the scenes, but presents it to you as one transaction. KyberSwap's comparison points out that this consolidation often beats bridging and swapping manually because it collapses fees into a single flow instead of stacking them. Swapping ETH on Ethereum for USDC that lands on Polygon, for instance, can complete as one signed transaction instead of a bridge followed by a separate swap. Same-chain swaps execute in seconds through AMMs; cross-chain versions take a bit longer since they're coordinating across networks, but they still beat doing each leg separately.
Bridge vs Swap: Comparing Fees, Speed, and Trust
The real question behind bridge vs swap comes down to what you get on the other end and what you're trusting to get there. DEXTools frames it simply: is the asset wrong, or is the chain wrong? That single question resolves most confusion.
- Asset outcome: a bridge gives you the same token (often wrapped) on a new chain; a swap gives you a different token, potentially on the same chain.
- Steps and fees: bridging typically means gas on the source chain, a bridge fee, and gas on the destination chain, three separate charges. A swap usually consolidates into one gas payment plus a pool fee.
- Timing: same-chain swaps settle in seconds. Bridges can take minutes to hours depending on confirmation requirements and whether the destination chain needs a challenge period.
- Trust surface: swaps mainly expose you to AMM and liquidity risk. Bridges add validators, relayers, or smart-contract guardians that you're implicitly trusting every time you cross a chain.
That last point deserves weight. Every bridge you use adds one more set of actors who could fail, get hacked, or make an error. A swap keeps that exposure contained to a single chain's contracts. Neither is automatically safer in isolation. It depends on which bridge, which pool, and how much you're moving, but the structural difference in how many trust assumptions you're stacking is real and worth tracking before you commit funds.
Bridge and Swap Risks You Should Actually Worry About
Bridges and swaps fail in different ways, and knowing which failure mode applies to your transaction changes how carefully you should check things before signing.
Bridge risk concentrates in three places: smart contract exploits, validator or relayer compromise, and wrapped-asset depegs where the wrapped token loses its 1:1 backing during a crisis. Bridges were a major source of exploit losses in 2022 across the industry, largely because locking large sums in a single contract creates an obvious target. Swap risk looks different: slippage on thin pools, liquidity that dries up mid-transaction, malicious tokens designed to drain approvals, and routes that simply fail to execute at the quoted price.
Here's how to cut exposure on either side:
- Favor bridges with a long operating history and high transaction volume over brand-new ones promising better rates.
- Verify the contract address you're interacting with against the project's official documentation, not a link from a chat message.
- Run a small test transfer before moving a large balance, especially on a route you haven't used.
- Approve only the exact amount needed rather than granting unlimited allowances.
Pro Tip: Revoke old token approvals periodically. A forgotten unlimited allowance from a swap you did a year ago is one of the most common ways wallets get drained, long after you've stopped thinking about that transaction.
For a deeper walkthrough on locking down bridge transactions specifically, see how to bridge crypto safely.
How to Estimate Total Cost and Time Before You Move Funds
Add up the pieces before you commit, because the sticker price rarely tells the whole story.
- Bridge costs: gas on the source chain, plus the bridge's own fee, plus gas on the destination chain to finalize or claim.
- Swap costs: one gas payment, the pool's trading fee, and slippage based on trade size versus liquidity depth.
Small transfers usually favor swaps or cross-chain swaps since fixed gas costs eat a bigger share of a small balance. Larger transfers can justify a bridge's extra steps if the destination chain offers meaningfully better yields or lower ongoing fees. Routing through a deep, bridge-supported stablecoin on the cheaper chain first, then bridging that stablecoin, often minimizes cumulative slippage compared to bridging a volatile asset directly. Route-comparison tools that check gas fee optimization across options before you sign can shave a meaningful chunk off either path, since the "best" route shifts constantly with network congestion.
When to Bridge, When to Swap, When to Do Both
Match the method to what you actually need on the other end.
- Bridge when you need the same token on a new chain. Moving USDC to a Layer 2 to use a lending protocol, or preserving your exact token exposure to keep staking rewards intact, both call for a straight bridge.
- Same-chain swap when you're staying put. Rebalancing a portfolio, grabbing a quick trade before a price moves, or paying for something denominated in a different token on the same network, all standard swap territory.
- Cross-chain swap when you need a different token on a different chain, right now. Say you're holding ETH on Ethereum but need USDC on Base to use immediately. A cross-chain swap gets you there in one step instead of bridging first and swapping second.
For chain-specific advice on where liquidity actually runs deepest for common swaps, OmniRout's guide to picking a chain for swaps breaks down which networks handle size well and which ones you should avoid for larger trades.
A Pre-Transaction Checklist for Choosing Safely
Run through this before you sign anything:
- Confirm the decision rule first: same token, different chain means bridge; different token, any chain means swap.
- Compare quoted routes for total cost and minimum amount received, not just the headline rate.
- Check the liquidity depth of the pool or bridge you're about to use.
- Look for an audit history and meaningful transaction volume rather than relying on marketing claims.
- Run a small test transfer on any route you haven't used before.
- Verify the contract address independently before approving anything.
- Set a slippage tolerance appropriate to the trade size, tighter for large stablecoin trades, looser for volatile or thin pairs.
- Approve only the specific amount needed for that transaction.
Pro Tip: If a route looks unusually cheap compared to every other quote you're seeing, that's a signal to slow down, not speed up. Unusually good pricing on an unfamiliar bridge is one of the more common setups before a rug or an exploit.
How Omnirout Helps You Compare Bridge and Swap Routes
Route comparison is the part most people skip, and it's usually where the money leaks out. There are non-custodial aggregators built specifically to show you fees, gas, and slippage across available routes before you commit to one.
- You keep control of your keys the entire time, no custodial handoff at any point.
- Route comparison surfaces whether a straight bridge, a cross-chain swap, or a multi-leg path actually costs less for your specific transfer.
- Coverage across many chains means you're not stuck comparing quotes manually across multiple different interfaces.
Aggregators that compare routes on fees, gas, and slippage reduce the guesswork that leads people into double-fee situations, paying a bridge fee and a swap fee separately when a single cross-chain swap would have covered both. That's the gap this kind of tooling is built to close.
What Actually Matters Once You Understand the Mechanics
The decision rule sounds almost too simple: same token, different chain, bridge; different token, any chain, swap. Most of the friction people run into isn't confusion about that rule. It's skipping the verification step because the interface made everything feel automatic.
I'd add one refinement to the conventional advice: don't just ask which method to use, ask whether you need to cross chains at all. Every bridge hop adds a layer of validators or contracts you're trusting, and that risk compounds if you bridge first and swap later instead of using a single cross-chain swap. Route comparison isn't a nice extra step. It's the difference between paying one fee stack or two, and between trusting one contract or three.
Test small before you move size, confirm liquidity on the receiving end, and treat every wrapped asset as a slightly different bet than the token you started with.
— Emanuele
Compare Your Route Before You Move Anything
Some platforms give you what most wallets and single-chain DEXs don't: a side-by-side view of bridge and cross-chain swap routes before you commit funds, so you're not stuck guessing whether a two-step bridge-then-swap costs more than a single cross-chain transaction. You can stay non-custodial the entire time, keys in your wallet, nothing handed off to a middleman.
If you've read this far, you already know the decision rule. What you don't know until you check is which specific route, across which chains, actually gets you there for less. Head to Omnirout and run a route comparison on your next transfer before you sign anything. It takes less time than reading this sentence twice, and it usually pays for itself on the first transaction.
Sources
- Crypto Bridge vs Swap: What's the Difference and Which One to Use | Gem Wallet
- Bridge vs Cross-Chain Swap: What’s the Difference in DeFi? - KyberSwap Blog
- Ethereum